Saturday, 21 January 2012

MAC Satin Taupe Eyeshadow Review and Swatches

I was on a mission.
...and then I got sidetracked by this awesome colour.

After years of seeing it used in makeup tutorials, I finally decided to purchase satin taupe eyeshadow from MAC.
MAC satin taupe eyeshadow
I expected a taupe-grey colour similar to Urban Decay's mushroom, and while they look different in the pan, they apply similarly. Satin taupe has more of a mauve kind of undertone to it, and its finish is satin-shimmer. Mushroom is darker, more grey, and much more shimmery, so it looks lighter when applied.

Here it is!


Colour payoff is really nice, but I generally don't reach for my MAC shadows as much as some of my other favourites. That may change now.
Swatch with flash
Swatch without flash

The only thing I had trouble with was that this colour faded a bit by the end of the day. I sometimes have this problem with certain MAC shadows. And yes I used primer!

Overall, this colour is very pretty and would suit practically any skin tone, depending on how you use it.
I got the refill pan at MAC for 13.50$.

Thursday, 12 January 2012

New Inglot Setup!

Before Inglot became popular on YouTube, I become clinically dependent upon their delectable shadows.
Seriously. I bought one or two new colours ever couple of weeks.

This was my former setup.... It consists of one large empty Inglot palette without slots for the pans, and two CD cases that I taped a magnetic sheet to. Pale neutrals in one case, dark neutrals in the other, and colours were in the huge one (which is now discontinued! WHY?!).
Inglot squares, large circles, small circles; Makeup Forever 92; Urban Decay

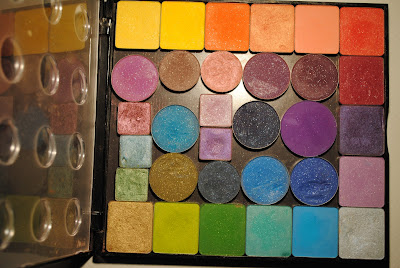
To avoid continuing on with my addiction, I finally decided to purchase the Freedom System palettes!!!
That way, I have no place to put new eyeshadows unless I save up to buy a whole new palette.

Well anyway, here they are! I already had the eyeshadows.


They look messy.... it just means they are well-loved!
BoomBoom! BoomBoom! BoomBoom! BoomBoom!


Now now, I can't have photos napping on the job.... must fix this

 What I really like about these palettes is that you can arrange the colours any way you want, which often inspires makeup looks for me.
They can be rearranged, but the magnet is so strong that I had to  use a nail file to pop them out... Which resulted in some tragic gouging of heavenly eyeshadow.

The pigmentation of the matte colours and matte-with-sparkle-but-no-shimmer colours is very unique... Over ordinary primer with an ordinary brush, they may seem mediocre depending on the particular shade. But layered over a suuuuper thin, well blended out creamy base, the pigment just grabs on for dear life and literally shakes with vibrancy! I find them easy to blend.

The shimmer/frosty colours are breathtaking.
I can't even discuss it.
Swatcheroos....


493: Lighter matte lilac in real life with a bit of sparkle.
439: Deep purple with cool blue shimmer
28: Icy blue with silver and blue shimmer
371: Ridiculous matte electric blue
473: Matte teal-turquoise with a golden sparkle


474: Lighter, smooth matte yellow with gold sparkle
60: Mustard, similar to Chrome Yellow by MAC with a golden sparkle
59: Lime-yellow-green that walks all over every other lime green I've ever had
58: Slightly dark matte grass green with gold and green sparkle
06: Olive with golden shimmer


07: Light shimmery gold with peachy undertone
405: Shimmery peachy bronze
406: Shimmery toasty bronze
409: Yummy shimmery deep bronze
402: Medium shimmery plum colour, good for blending out purples


361: Light, matte peachy pink like a pink rose petal
407: Coral with gold shimmer
51: Vivid, matte carrot orange
495:Matte red hot pink with gold sparkle
74: Matte deeper magenta with peachy sparkle

Gorgeous colours! There is something for everyone, trust me. By now I've been in the store over 40 times and covered my arm with every colour in there!!! So go in, have fun, their eyeshadows are only 10$ each compared to the 13 something at MAC, with almost twice the product.

Please send any requests to lizziehanley94@yahoo.ca

Tuesday, 10 January 2012

Fun Purple Nails

For Christmas, I got my very first crackle-style polish!
Welcome, Sally Hansen Crackle Overcoat in Ink Splatter.

Ink Splatter

I decided to pair it over a not-so-pale purple, because I didn't want too much of a contrast with the black. I used a Forever 21 nail polish. I can't find it anymore, but I believe it is called Love&Beauty Magenta. It is a gorgeous purple that is lighter than Makeup Forever #92 eyeshadow.
Silly comparison, I know.
Love&Beauty Magenta?

The Sally Hansen black overcoat is pretty matte somehow, but I used topcoat to make it shine. The splintery black areas are thinner and more sparse with a thin layer, and larger with smaller cracks if you use a thick coat.
Obviously two coats would not create a very nice effect.

Just thought this was a nice nail look for winter. Cooler tones, not glittery or too crazy. Hope someone out there tries this out!

The Forever21 polish retails for 2.80.
The Sally Hansen Crackle Overcoat is under 10$.

Please send any requests to lizziehanley94@yahoo.ca

Thursday, 5 January 2012

Makeup on Sammy

Sam does not like to wear makeup.
But I convinced her to let me attack her face for her grad photo about a month ago. YAY! I love my sister.
I wanted to keep it simple because she likes her gorgeous natural look, and I like how it turned out. I would have made it even lighter if it weren't for my uncontrollable urge to make her over. Plus I had flash photography to consider.

Isn't she cute, trying not to laugh at me!

What a cutie
Daylight


Products Used:

Face:
-Cover FX Skin Prep
-Makeup Forever HD foundation #110
-Benefit Boi-ing concealer #01
-Laura Mercier Universal translucent powder
-Tarte Amazonian Clay Bronzer Park Avenue Princess
-Nars Blush Orgasm

Eyes:
-Too Faced Shadow Insurance
-NYX Jumbo Pencil Milk (inner corners)
-Inglot #351 light cream (inner corners, eyelid, browbone)
-Tarte Bronzer (blended in crease)
-Urban Decay Twice Baked (outer crease, lower lashline)
-Revlon Colorstay black eyeliner (upper lashline)
-Inglot #65 sparkly black (on top of eyeliner upper lashline)
-Maybelline Black Colossal Mascara

Lips:
-A bit of Inglot Sleeks Cream #89 (sheer, coral peachy shade)

Hope you enjoy!

Please send any requests to lizziehanley94@yahoo.ca

Wednesday, 4 January 2012

Urban Decay Primer Potion VS. Too Faced Shadow Insurance

My very first eyeshadow primer was Urban Decay's Eyeshadow Primer Potion. It was shortly after I had seen my first makeup tutorial on YouTube by MissJessicaHarlow. It was a gorgeous green smokey eye look, and I was completely hooked. I've been obsessed by everything related to makeup ever since.
Similar in length

In the video, she used Too Faced Shadow Insurance. Every time I window shopped at Sephora I would stare at TFSI with drool on my mouth. Alas, it made my wallet fearful. So one day, I picked up UDPP on a whim instead because at the time, it was less expensive. I had never even heard of it until after I bought it.

I must say, I fell in love!!! It was my first experience wearing eyeshadow that lasted for any length of time. On one new years eve, I had done my makeup for a family party, and I was booked for a flight to Cuba at 6 am on the 1st. I didn't bother going to sleep that night, and when we finally landed in Cuba that afternoon, my mom asked me when I had done my makeup. When I replied "yesterday", she couldn't believe how flawlessly it had lasted! Neither could I. I have oily eyelids yet my makeup did not crease at all. It never has any other time I used it.
You can see where the bottle chipped :(

I bought it in the original packaging which was similar to a lip gloss tube. This was not ideal because the wand could not reach all of the product on the inside edges of the tube. I ended up wasting a lot of product also because the tube itself was made of a softer plastic and little pieces shipped off. Lots of primer dried up.
Too Faced Shadow Insurance
Close-up
Eventually, after watching hundreds of xsparkage videos, I decided to try TFSI out. I liked it more than I thought I would. It was more moisturizing than UDPP, and I felt like it was a bit smoother, too. Maybe even easier to apply and blend it into the skin, and the eyeshadow too. However, it is much thinner than UDPP, and I feel like its barrier between my skin and my eye makeup is not as strong. The oils in my skin wore through it after a few hours, but once it started to crease even a little, that was as bad as it got.

New packaging of Urban Decay Primer Potion
More product...hopefully not to be wasted


So I bore minor creasing for around a year. This is my first tube, and it still has about half the product left in it.

Then, Urban Decay did a Wonderful thing... They redesigned their packaging!!! *APPLAUSE*
Hello!

It is similar to the TFSI tube, but fatter. The hole is larger in the UDPP, so I have to be careful not to squeeze out too much product.
UDPP contains 0.37 oz and retails for 19$. That means 0.01947 oz per dollar.
TFSI contains 0.35 oz and retails for 18$. That means 0.01944 oz per dollar. Urban Decay gives you (hardly) more for your money.
 I have read on Musings of a Muse's blog that the product may dry up faster in the new packaging because air is being pumped into it. Somehow, I think this is more true for a lip gloss-styled tube. Only time will tell which is true. So far, the squeeze tube is very convenient and I already love the product itself.
Victory is yours, UDPP!
Overall, I think Urban Decay wins on this one. My eyeshadow lasts for an obscene amount of time when I use it, and that is really all I need my primer to do. I may continue to use my TFSI in the winter and on other people because it is more moist, but for heavy-duty wear, UDPP is the best for me. For dryer and more mature skin, TFSI might work better.
UDPP is available on Urban Decay's website for 19$.
TFSI is available on the Too Faced website for 18$.

Tuesday, 3 January 2012

Sugarpill Swatches!!!

Here they are!

Royal Sugar, Tipsy, Birthday Girl


Royal Sugar, Tipsy, Birthday Girl


 Beautiful, non?

Monday, 2 January 2012

MAC Dazzlesphere! Berry Ornament Review

I love shimmer. Everyone who knows me and knows I love makeup recognizes this fundamental need I have. It can sometimes turn into a problem because makeup, like everything else in life, costs money.

And I am cheap.

Sometimes, to torture myself, I wander into MAC or Sephora or Inglot and play with the gorgeous colours I find in there. I'd been dreaming about these fantastically pretty pigments for a while, waiting for a makeup artist friend of mine to come to MAC with me so I could get a discount. Sadly it never happened, so I took it upon myself to purchase them on a whim.
The whole "limited edition" thing really did give me a sense of urgency and I felt like I would be losing something if I left them there.

I hate how the cosmetic industry has that hold on me.

Awesomely shiny spherical packaging

Hello, Dazzlesphere Berry Ornament!!!                           
Here is what MAC has to say about this product:

DAZZLESHPERE! BERRY ORNAMENT X 4: Adding spice to our couture-future ornament: two shades of Roasted Chestnut and Spicy Smoke. Add Pearl and Rose Light to this mini-set of four stackable Crush Metals and see how brilliant your looks can be. Gift yourself! Limited edition.

To start off, these are extremely well pigmented. The shimmer itself is more prominent than the undertone of each colour itself, but applied wet, these look almost like glitter and the colour becomes more vibrant.

Urban Decay’s primer potion is my go-to primer, but I knew that these would need something more binding to stick to because they are very loose and sparkles just flew everywhere. I tried using my NYX Jumbo Eye Pencil inStrawberry Milk on top of UDPP to get the product to stick, but it caked up when I brushed it on because my skin would fold ever so slightly, and this created gaps in the application. It looked better when I packed it on, but foiling the pigment worked best for a smoother texture on my lids.

 I love the colours in this pigment stack! They are warm-toned berry shades, hence the name, and I find them versatile.
Pearl on top, Rose Light on the bottom

blah blah blah 6 grams

Pearl

Rose Light

Spicy Smoke on top, Roasted Chestnut on the bottom


yadda yadda crushed metallic pigment

Spicy Smoke is redder and not as dark in real life

Roasted Chestnut is more bronze in real life
 Here are some swatches:
Pearl, Rose Light swatched dry

Spicy Smoke, Roasted Chestnut swatched dry

 
Crooked lid
The packaging does not feel very sturdy. Like my Lise Watier pigment in Folie Blanche, the clear plastic feels brittle, like it might crack easily. Folie Blanche certainly did. Also, it is not exactly easy to screw the lid back on without pigment spilling out. I had to unscrew and re-screw it on very gently and precisely to it didn’t have a gap for potential spillage. Folie Blanche also has this problem.
I’m also not sure how I feel about the top jar acting as a lid for the bottom jar. Being extremely clumsy, I tend to drop lids as I unscrew them because I often do my makeup in a hurry. It is obviously not good for the “lid” to fall if it contains 6 grams of product I paid around 40$ for.

I know it seems like I have a lot more complaints than compliments about this product, but I must remember to focus on qualities that are more important to me. In a loose eyeshadow, I mainly look for great pigmentation and a decent amount of product for my money. I bought these for 38$ and some change, plus tax. Divided by 4 pigments, they cost me less than 10$ each, which is more than I can say for my Sugarpill Chromalusts, which retail for 12$ each for only 4grams of shadow.
Plus shipping.

So overall, I do really like these. It just takes a teensy bit of experimenting to make them work, and I’m sure it would be different for everybody. Wetting my brush happened to work best for me when using it. Plus, the shimmer is sooooo pretty!!!!! They also sell a blue-themed stack, a purple one, and various lip products in spheres.
I like you
These retail for 32.50 on MAC’s website and in MAC stores, but I paid around 38.50 plus tax because I live in Canada.
Please send all requests to lizziehanley94@yahoo.ca